[Part 2 of a 3 part series]
Domain management with Wildfly 8.2
Introduction
 In this post we’ll walk through the basic steps required to set up a Wildfly cluster with a domain controller controlling the domain members (nodes) that form part of the cluster. If you haven’t read the post on configuring Apache with mod_cluster on Ubuntu, I recommend doing so before continuing with this article.
Just to recap, in part 1 of this series we configured Apache with the mod_cluster load balancer, where we were working in the host network of the deployment model you see below. In this article, we’ll be working in the application network of the deployment model seen below.
Concepts
Before we get our hands dirty, let’s run over some basic concepts and terminology used in this article.
There is a difference between domain management and clustering in the IT infrastructure community:
A Cluster is a runtime environment, which provides session failover (replication) and / or loadbalancing for an application. This helps when large applications are required to use multiple servers for load balancing and session failover (replication), without application downtime.
Domain management can be described as and administration/configuration management practice to manage configurations and deployments from a single point, which then simplifies the administration of servers and deployments. Domain management is typically done after a cluster has been set up. An example of a tool which aids in this practice is the administration console (typically on port 9990) that a person can use after starting a JBoss server.
Tip: before trying to access the administration console on JBoss/Wildfly, create a management user with which you can access it. You can use the add-user.bat or add-user.sh script located in
What we need
For this article we’ll need two machines running Ubuntu 14.04. To keep things simple, we’ll want this two machines on the same network as the machine which houses Apache with mod_cluster.
Although not mandatory, static IPs for these machines will prevent a lot of future frustrations.
One machine will act as our ‘master’, and the other as our ‘slave’. The master and slave will both run Wildfly 8.2 and we’ll add server instances to both of them without add and starting up another instance of Wildfly. Our master will also be our domain controller through which a demo app will be deployed.
In our set up, we used VirtualBox’s host only network to give my two Ubuntu VMs static IPs. We’ll use those IPs where appropriate – just change the relevant IPs to the IPs of your machines. In our case, the master machine’s IP was 192.168.56.101 and the slave’s IP was 192.168.56.102.
Note: this article assumes you’re familiar with VirtualBox and how to manage VMs. Drop a comment below if you would like to learn more about doing this.
Installing Wildfly et al
We’ll install these tools by issuing commands to Ubuntu’s command line
Note: change to root user to prevent access permission issues when accessing apt-get.
Before we start, we want to make sure our package lists from the repositories are upaded to get information on the newest versions of packages and their dependencies. To do this, just run:
Update
apt-get update
Wildfly 8.2.0
To download the application server we are going to use wget.
Navigate to /opt/ and issue the following command:
Get Wildfly
wget download.jboss.org/wildfly/8.2.0.Final/wildfly-8.2.0.Final.zip
Unzip
To unzip the folder, you can use the unzip utility (if it is not available, apt-get install -y unzip should get it for you).
Unzip
unzip wildfly-8.2.0.Final.zip
Start Wildfly
Just to double check, we make sure everything is running alright.
Start Wildfly
cd wildfly-8.2.0.Final/bin/
./domain.sh
Verify Wildfly
To verify Wildfly is running, we can quickly use telnet, like so
Telnet
telnet
You should be seeing output indicating that telnet has connected to the specified host.
Repeat Master & Slave
Repeat the above on master and slave before moving on to the next step. Remember to stop Wildfly before continuing.
Java
Since we’re running Java-enabled applications, it’ll be better to ensure the latest version is installed. You can check if Java is installed by issuing Java -v in the command line. To install the latest Java version, we can run the following commands:
Repeat the above on master and slave before moving on to the next step.
Install & configure Java
apt-get install -y python-software-properties
add-apt-repository ppa:webupd8team/java
apt-get update
apt-get install -y oracle-java8-installer
echo JAVA_HOME=/usr/lib/jvm/java-8-oracle >> /etc/environment
source /etc/environment
echo $JAVA_HOME
Git and Maven
This is only required for our master machine. We’re going to clone and package a demo project in the Deployment section.
To get git and maven, we can use the following command:
apt-get install -y git maven
Next, we’ll start with the domain configuration for our cluster.
Domain configuration
In this section, we’ll set up both master and slave to enable them to run in domain mode. We will configure the master to be the domain controller.
Interface configuration on Master
First open the host.xml in master for editing: Master vi /opt/wildfly-8.2.0.Final/domain/configuration/host.xml The default settings for interface looks like this: Master Interfaces - DefaultWe need to change the address of the management interface in order for slave to connect to master. The public interface allows the application to be accessed by non-local HTTP, and the unsecured interface allows remote RMI access. Using our master's IP address, the interfaces section now looks like this: Master Interfaces - Modified Lastly, we'll change the server entry in the other-server-group in master's host.xml file. The only change we'll make is to change the auto-start attribute to true so that the server instance automatically starts up when we start up Wildfly. The server entry configuration section will look like this after the change: Server entry
Interface configuration on Slave
Next, we'll modify the host.xml in slave:: Slave vi /opt/wildfly-8.2.0.Final/domain/configuration/host.xml The configuration we'll use on slave is a little bit different, because we need to let slave connect to master. First we need to set the hostname. We change the name property from: Host name - defaultto Host name - modified Then we need to modify the domain-controller section so slave can connect to master's management port: Domain controller 192.168.56.101 is the IP address of master. If you take a look at the master's host.xml, you'll see that the management interfaces are listening on port 9999. Finally, we also need to configure interfaces section and expose the management ports to the public address: Slave Interfaces - Modified 192.168.56.102 is the IP address of slave. In the slave host's host.xml file, we'll change the server name for the server belonging to other-server-group. This is required because mod_cluster will fail to register the hosts (Wildfly instances or nodes) with the same name in a single server group. This also helps that we don't get confused between the server names between master and slave. We'll also change the auto-start attribute to true so that the server automatically starts up when Wildfly is started. The configuration section will look like this after the mentioned changes: Server entry
Security configuration
Now, start Wildfly on both master and slave by using the domain instance – /opt/wildfly-8.2.0.Final/bin/domain.sh. Master should be running fine, but slave will complain that it cannot authenticate itself as shown below.
Auth exception
[Host Controller] 06:53:15,293 ERROR [org.jboss.remoting.remote.connection] (Remoting "deon-vbox-slave:MANAGEMENT" I/O-1) JBREM000200: Remote connection failed: javax.security.sasl.SaslException: Authentication failed: the server presented no authentication mechanisms
 06:53:15,302 WARN [org.jboss.as.host.controller] (Controller Boot Thread) JBAS010900: Could not connect to remote domain controller at remote://192.168.56.101:9999 -- java.lang.IllegalStateException: JBAS010942: Unable to connect due to authentication failure.
This is because we haven’t properly set up the authentication between master and slave. We’ll start by adding users to master. One of them will be used for slave.
Master
Add user output ./bin/add-user.sh
What type of user do you wish to add?
a) Management User (mgmt-users.properties)
b) Application User (application-users.properties)
(a): a
Enter the details of the new user to add.
Using realm 'ManagementRealm' as discovered from the existing property files.
Username : admin
The username 'admin' is easy to guess
Are you sure you want to add user 'admin' yes/no? yes
Password recommendations are listed below. To modify these restrictions edit the add-user.properties configuration file.
- The password should not be one of the following restricted values {root, admin, administrator}
- The password should contain at least 8 characters, 1 alphabetic character(s), 1 digit(s), 1 non-alphanumeric symbol(s)
- The password should be different from the username
Password :
JBAS152565: Password must not be equal to 'admin', this value is restricted.
Are you sure you want to use the password entered yes/no? yes
Re-enter Password :
What groups do you want this user to belong to? (Please enter a comma separated list, or leave blank for none)[ ]:
About to add user 'admin' for realm 'ManagementRealm'
Is this correct yes/no? yes
Added user 'admin' to file '/opt/wildfly-8.1.0.Final/standalone/configuration/mgmt-users.properties'
Added user 'admin' to file '/opt/wildfly-8.1.0.Final/domain/configuration/mgmt-users.properties'
Added user 'admin' with groups to file '/opt/wildfly-8.1.0.Final/standalone/configuration/mgmt-groups.properties'
Added user 'admin' with groups to file '/opt/wildfly-8.1.0.Final/domain/configuration/mgmt-groups.properties'
Is this new user going to be used for one AS process to connect to another AS process?
e.g. for a slave host controller connecting to the master or for a Remoting connection for server to server EJB calls.
yes/no? no
I created a user called admin, with password admin. Although this is not a secure practice, this is sufficient to get the config working. Repeat the same process and add a user for the slave host on the master. I created a user with a similar pattern to admin, except where it asks: "Is this new user going to be used for one AS process to connect to another AS process?", reply yes.
The username you give to the user you intend to use for the slave host should be the same as the name you entered in the slaves host element in host.xml -
Slave
On the slave host, we need to modify the host.xml for authentication. After modifying the security realms section, it should look something like this:
Security realm
…
We’ve added server-identities into the ManagementRealm security-realm, which is used for authenticating the slave host when it tries to connect to master. Because the slave’s host name is set as ‘slave’, we should use the ‘slave’ user’s password on master. In the secret value property we have ‘c2xhdmU=’, which is the base64 code for ‘slave’ – the password we entered for slave. You can generate this value by using a base64 calculator.
Next, we just need to add the security realm to the slave host’s domain controller so it knows which security-realm to use to authenticate.
Domain controller
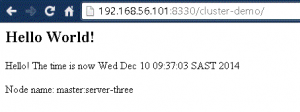
Now, try starting slave again, by using the domain instance. If all is well, we’ll see the following output log on slave:
Output
[Host Controller]
07:24:56,603 INFO [org.jboss.as.host.controller] (Host Controller Service Threads - 3) JBAS016582: Connected to master host controller at remote://192.168.56.101:9999
This means that the domain configuration is correct and working and that our master and slave hosts are running in domain mode!
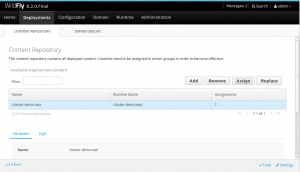
Deployment
In this section we’ll clone a demo project, build it and then deploy it through the management interface on our master host.
In this section we’ll clone a demo project, build it and then deploy it through the management interface on our master host.
Get the demo project
Clone the following project at a suitable location:
Clone project
git clone git://github.com/liweinan/cluster-demo.git
This demo project is a simple web application. In web.xml we’ve enabled session replication by adding the following entry:
web.xml
We can further configure session replication, by the above is sufficient for our needs. If interested, this documentation[4] provides more details.
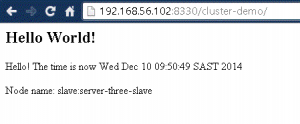
To test session replication and the cluster, this app uses a simple expression in a jsp page (put.jsp) to put the current time in a session entry as shown below:
Put session entry
<% session.setAttribute("current.time", new java.util.Date()); %>
Get session entry
The time is
<%= session.getAttribute("current.time") %>
<%= session.getAttribute("current.time") %>
We’re going to make a small change to every .jsp page in the project (3 in total), so we can see which node in the cluster served the request. Add the following line just before the closing body (