LDAP Tutorial: An Introduction

Have you ever wondered how to set up LDAP and spending a lot of time reading documentation and tutorials with nothing to show? This introductory tutorial shouldn’t take you longer than an hour to work through and you get to play with Java code to interact with our LDAP directory.
This article sets out to describe the bare minimum on how to set up a basic LDAP directory using OpenLDAP, connecting to it using JXplorer, populating our LDAP directory using LDIF scripts and lastly, how to interact with our LDAP directory using a simple Java client.
Note: we won’t be looking at security and permissions in this article and will only set up the bare minimum to get familiar with the technologies.
Concepts
<>Instead of “copy pasting” a bunch of terms from the Internet, you can take a look at an extensive glossary regarding LDAP terminology here.
What do we need?
Before we can get started, we obviously need to have the right tools. For this guide, we’re going to use OpenLDAP and JXplorer. If you don’t have these tools, click on the links provided to download a copy.
For this article, we’ll be using a Windows machine.
Our first LDAP directory
In this section we’ll make some changes to a LDAP config file and start up the OpenLDAP server.
We’ll follow the steps below to accomplish this.
- Navigate to \OpenLDAP\etc\openldap and open the slapd.conf file.
- Scroll down to the section containing the BDB Definitions (Berkeley Database).
Changing configurations in slapd.conf
Change the suffix to:
and the rootdn to
and the rootpw to something you’ll remember, like so
That is all we have to change for now to accomplish what we’re setting out to do.
Note that in a production setup, we’ll use a cryptographic hash function to generate a hash value for our password and put it as the value for rootpw.
Start the LDAP server
Using a command prompt, navigate to:
<path_to_open_ldap_install>\OpenLDAP\libexec
and execute the StartLDAP script. If everything went well you should see some output from the server daemon. If you scroll up a bit in the output you’ll see the output we are interested in:

You’ll notice that the base DN (distinguished name) we put as the value for the suffix property in our slapd.conf file has been successfully registered and opened by the server. You’ll also notice that the output provides you with the directory where the data for the DB is stored.
On a side note, it is advised to always properly shut down the OpenLDAP server. To do this, issue the abort command Ctrl+C and select yes (Y/y) when the server asks you to terminate the batch job. If we do not properly shut down the server it will struggle to initialise all the necessary files when we try to start it again, because it never had the chance to release the lock file.
When you find yourself in this situation, navigate to
path_to_open_ldap_install>\OpenLDAP\var\openldap-data
and delete the alock file. After the file has been deleted and you try to start up the OpenLDAP server again it should succeed.
We have our first LDAP directory running – yay!
Next, we’ll try to connect to it using a LDAP browser.
Connect to our LDAP directory
In this section we’ll use JXplorer to connect to our LDAP directory we started in the previous section. We’ll populate the directory in the following section; we’re just going to get a grasp of the tool to interact with our LDAP directory.
Steps to connect to our LDAP directory.
- Start up JXplorer
- Select the “Connect to a DSA.” (Directory System Agent) icon in the top left or from the File option in the menu bar at the top.
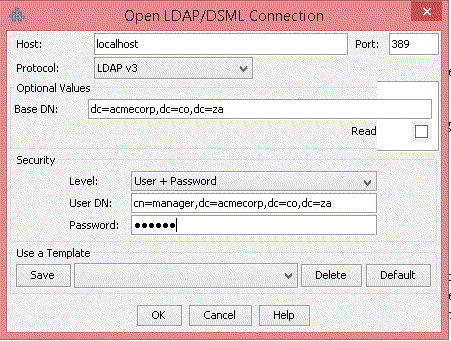
- In the popup presented, we’ll fill in the Host, Base DN, Security Level, User DN and Password fields.
- For the Host field, we provide the following: localhost. This is because the OpenLDAP server is running on our local machine.
- For the Base DN field, we provide the following: dc=acmecorp,dc=co,dc=za
- For the Security Level field, we select User + Password.
- For the User DN field, we provide the following: cn=manager,dc=acmecorp,dc=co,dc=za
- For the Password field, we provide the rootpw, in this case: secret
- The populated fields should look like this picture
If the connection succeeds, you’ll get a couple of messages saying that a certain operation could not be performed.
This is because we need to register our Base DN and populate our directory, which brings us to our next section.
Stop, LDIF time
If you got the reference, please take this hi-5 and a free browse on the internet that you can claim here!
Now, we’re going to use LDIF files which will represent our LDAP directory content. We’ll provide the LDIP file with a short explanation on what is going on. In order for our directory to work as expected, we’ll execute the files in the order provided.
To execute the below scripts, we’ll use the ldapadd tool. This tool can be found in \OpenLDAP\bin. To execute the ldif file, we’ll issue the following command in our command line:
Ldapadd
Change , and accordingly.
The meanings of the flags are the following:
-x: Simple authentication
-D: bind DN.
-f: file to read operations from
Register our Base DN
To do this we’ll use the following LDIF script:
acmecorp-registration.ldif
objectclass: dcObject
objectclass: organization
o: Acme Crop
dc: acmecorp
Create organisation
Create AcmeCorp and bind it to our Base DN . To do this we’ll use the following LDIF script:
acmecorp-registration.ldif
objectclass: top
objectclass: organization
description: Acme Corp (PTY) Ltd
telephonenumber: 011 123 4567
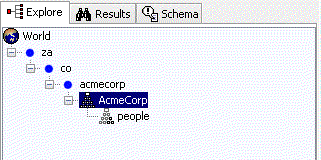
If we go back to our JXplorer and refresh the tree, we’ll see that the AcmeCorp node has been added to our directory tree, like this:

Create an Organisation unit
Name it people, who belong to the AcmeCorp organisation
To do this we’ll use the following LDIF script:
acmecorp-people-ou.ldif
ou: people
description: All people in the organisation
objectclass: organizationalunit


