
Original Implementation of Stock Monitor
Author: Tony Wang
Introduction

“Do you know Spring? What about Angular?” are questions that often get asked during discussions and interviews. After some research, I have decided to migrate my own application (Stock Monitor) to use the “new” frameworks and share my experiences and opinions regarding the migration process and the obstacles I have encountered, things I like, dislike and completely horrified, and whether it is applicable for large scale projects.
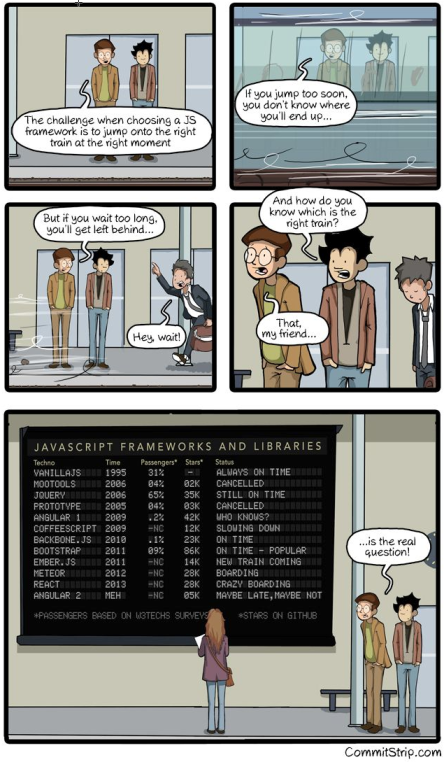
Are AngularJS and Spring Framework here to stay? Here is a comic that demonstrate my initial concern with new frameworks both back-end and front-end.
Original Implementation of Stock Monitor

The idea of Stock Monitor was to develop a desktop application for personal use to quickly access to stock portfolio without having to log onto stock broker’s site or requiring internet connection. It consists of simple MVC architecture with CRUD and charting functionalities. It was a proof of concept and was developed within one week. Here is a list of the technologies used and a screen shot of the application:
- PostgreSQL
- EclipseLink / JPA
- Java Swing
- JFreeChart
Implementing Stock Monitor Two-Point-Oh!
A great way to catch your reader’s attention is to tell a story. Everything you consider writing can be told as a story.
As the old adage goes: “if it ain’t broke, don’t fix it”. So why am I doing this?
- There are better ways of doing things, which provides learning opportunities whether it is technology, design pattern or different problem-solving mindsets.
- Keeping up with industry standards. If you are not improving, you are falling behind.
- To be able to demonstrate and present these new frameworks at Architecture Board in a job environment and discuss the implications of using such frameworks on existing projects.
if it ain’t broke, don’t fix it.
With a list of Java Frameworks and a list of JavaScript Frameworks available, how did I manage to choose Spring and Angular? Choosing the framework itself is quite daunting. The way I go about it is actually quite simple. Firstly, it has to meet the requirement for my application; secondly, the supporting community.
Stock Monitor 2.0 will need the following:
- Easy to scale
- Easy to test
- REST / SOAP Architecture
- Single page web application
- Framework maturity
- Security
Spring was an easy choice because it caters for these requirements, and has a large user base with constant update and fixes. AngularJS on the other hand has a fairly small user base according to statistics. I chose it because of the design philosophy, the MVC model for the front-end, working with modules, but the deciding factor is that Google is maintaining it (the next big thing?).
Now that the boring stuff is out of the way, I will discuss Spring and AngularJS in more details separately.
Disclaimer: please keep in mind that this is not a tutorial but an opinion piece based on my experience with these technologies. Also, my primary skill-set mainly reside in back-end development, so the learning curve varies between the front-end and the back-end development.
Spring Web MVC Framework, I choose you!
Here are a list of components and versions I used for the back-end framework:
- Java 1.8
- Maven 3.3.3
- Apache Tomcat 8.0.27
- Spring Framwork 4.2.1.RELEASE
- Spring Security 3.2.5.RELEASE
- Spring Security CSRF Token Filter 1.1
- Hibernate 5.0.2.Final
- Postgresql 9.4-1203-jdbc42
- slf4j 1.6.1
- Jackson JSON Processor 2.4.4
Spring Bean Configuration
Spring is easy to setup, by adding the Spring library in the Maven pom file, you are good to go. Spring uses the Model-View-Controller (MVC) convention for it’s configurations or Spring Bean Definitions which is require for dependency injection. There are three ways to go about configuring Spring Beans:
- Java Based Configuration
- XML Based Configuration
- Combination of Java and XML Configuration
What I dislike: I tried the XML configuration at first and it was fairly frustrating mainly because I refactored the project packaging structure a few times before I got the structure I wanted. The problem being that the XML configuration does not automatically update the references of the Java class when you move / rename classes, so it was a very manual exercise when it comes to refactoring. Also, as the project grows I would imagine that the size of this configuration file be fairly lengthy and complicated, however, this problem can be overcome by splitting the configuration file into multiple files. There are advantages though, anyone picking up the project can easily locate the configurations in a single XML file as oppose to crawling through the Java Code to understand the dependencies between the classes with annotations.
In the end, I chose the Java Based Configuration over XML, simply because I believe that code in itself provides a good-enough-documentation and it also makes debugging easier. Java Based Configuration works with annotations such as:
- @Configuration
- @Profile(“development”)
- @EnableTransactionManagement
- @Bean
- @EnableWebMvc
- @ComponentScan
- @EnableWebSecurity
I have four configuration files in the application: RootContextConfig.java,AppSecurityConfig.java, ServletContextConfig.java and WebAppInitializer.java. I have defined the configuration in a different package structure, separated from the main application like so:
- com.stockmonitor.app (holds the application logic)
- com.stockmonitor.conf (holds my configuration files)
When you add the @Configuration annotation to the Java class, Spring automatically identifies it as a configuration file, furthermore you can add@Profile(“name”) to define a different profiles with specific configuration, such as a testing or development with different properties such as datasource, testing configuration, test data etc.
The RootContextConfig.java below, it is where the main configuration for Stock Monitor reside. It is where I have configured the data source and transaction manager. The @ComponentScan annotation tells the application to go and look for other component within the folders that you have specified and add them to the application context, so the application is aware of them. This means that you do not have to declare every single component in the configuration file, Spring will automatically include them based on the path you have provided.
@Configuration
@ComponentScan({
    StringConstant.APPLICATION_ROOT_PATH + ".service",
    StringConstant.APPLICATION_ROOT_PATH + ".dao",
    StringConstant.APPLICATION_ROOT_PATH + ".init",
    StringConstant.APPLICATION_ROOT_PATH + ".security"})
@EnableTransactionManagement
public class RootContextConfig {

    @Bean(name = "transactionManager")
    public PlatformTransactionManager transactionManager(EntityManagerFactory entityManagerFactory, DriverManagerDataSource dataSource) {
        JpaTransactionManager transactionManager = new JpaTransactionManager();
        transactionManager.setEntityManagerFactory(entityManagerFactory);
        transactionManager.setDataSource(dataSource);
        return transactionManager;
    }

    @Bean(name = "datasource")
    public DriverManagerDataSource dataSource() {
        DriverManagerDataSource dataSource = new DriverManagerDataSource();
        dataSource.setDriverClassName(org.postgresql.Driver.class.getName());
        dataSource.setUrl("jdbc:postgresql://localhost:5432/stockmonitor");
        dataSource.setUsername("postgres");
        dataSource.setPassword("password");
        return dataSource;
    }

    @Bean(name = "entityManagerFactory")
    public LocalContainerEntityManagerFactoryBean entityManagerFactory(DriverManagerDataSource dataSource) {
        LocalContainerEntityManagerFactoryBean entityManagerFactoryBean = new LocalContainerEntityManagerFactoryBean();
        entityManagerFactoryBean.setDataSource(dataSource);
        entityManagerFactoryBean.setPackagesToScan(new String[]{StringConstant.APPLICATION_ROOT_PATH + ".model"});
        entityManagerFactoryBean.setLoadTimeWeaver(new InstrumentationLoadTimeWeaver());
        entityManagerFactoryBean.setJpaVendorAdapter(new HibernateJpaVendorAdapter());

        Map<string, object=""> jpaProperties = new HashMap<string, object="">();
        jpaProperties.put("hibernate.hbm2ddl.auto", "");
        jpaProperties.put("hibernate.show_sql", "false");
        jpaProperties.put("hibernate.format_sql", "true");
        jpaProperties.put("hibernate.use_sql_comments", "true");
        entityManagerFactoryBean.setJpaPropertyMap(jpaProperties);

        return entityManagerFactoryBean;
    }
}
</string,></string,>
The AppSecurityConfig.java is where I use the Spring Security and CSRF Protection to filter and block the access of specific paths in the URL and block cross site attacks via a unique token. It uses SecurityUserDetailsService from Spring Security to do the user lookup.
@Configuration
@EnableWebSecurity
public class AppSecurityConfig extends WebSecurityConfigurerAdapter {

    private static final Logger LOGGER = Logger.getLogger(AppSecurityConfig.class);

    @Autowired
    private SecurityUserDetailsService userDetailsService;

    @Autowired
    protected DataSource dataSource;

    @Override
    protected void configure(AuthenticationManagerBuilder auth) throws Exception {
        auth.userDetailsService(userDetailsService).passwordEncoder(new BCryptPasswordEncoder());
    }

    @Override
    protected void configure(HttpSecurity http) throws Exception {
        CsrfTokenResponseHeaderBindingFilter csrfTokenFilter = new CsrfTokenResponseHeaderBindingFilter();
        http.addFilterAfter(csrfTokenFilter, CsrfFilter.class);

        http
            .authorizeRequests()
                .antMatchers("/resources/public/**").permitAll()
                .antMatchers("/resources/img/**").permitAll()
                .antMatchers("/resources/bower_components/**").permitAll()
                .antMatchers(HttpMethod.POST, "/user").permitAll()
                .anyRequest().authenticated()
            .and()
            .formLogin()
                .defaultSuccessUrl("/resources/view/#")
                .loginProcessingUrl("/authenticate")
                .usernameParameter("username")
                .passwordParameter("password")
                .successHandler(new AjaxAuthenticationSuccessHandler(new SavedRequestAwareAuthenticationSuccessHandler()))
                .loginPage("/resources/public/login.html")
            .and()
            .httpBasic()
            .and()
            .logout()
                .logoutUrl("/logout")
                .logoutSuccessUrl("/resources/public/login.html").permitAll();
    }
}
The ServletContextConfig.java tells Spring that this is a Web MVC architecture via the @EnableWebMvc and scans for the controller layer. Other web security component can also be declared in here via the extension of theWebMvcConfigureAdapter.java.
@Configuration
@EnableWebMvc
@ComponentScan(StringConstant.APPLICATION_ROOT_PATH + ".controller")
public class ServletContextConfig extends WebMvcConfigurerAdapter {

    @Override
    public void addResourceHandlers(ResourceHandlerRegistry registry) {
        registry.addResourceHandler("/resources/**").addResourceLocations("/resources/");
    }
}
The WebAppInitializer.java basically replaces the web.xml configurations, you can define all you web.xml context in here, loading the all the configuration files on server start-up.
public class WebAppInitializer extends AbstractAnnotationConfigDispatcherServletInitializer {

    @Override
    protected Class[] getRootConfigClasses() {
        return new Class[] { RootContextConfig.class, AppSecurityConfig.class };
    }

    @Override
    protected Class[] getServletConfigClasses() {
        return new Class[] { ServletContextConfig.class };
    }

    @Override
    protected String[] getServletMappings() {
        return new String[] { "/" };
    }
}
I find the configurations are the hardest part about learning the Spring framework, there are many aspects that you can configure but Spring made it easy. Most of the configurations are by convention, so it is fairly intuitive to learn. Once you have configured the location of the components reside by declaring them with annotations, everything else falls into place and that is the strength of Spring. Now let us take a look at the components of Stock Monitor two-point-oh! Here you will encounter a few more annotations, which are more specialized @Componentannotation that declares the class as a Spring bean:
- @Repository
- @Service
- @Controller
Model & Data Access Object
The original model objects was implemented with EclipseLink, porting it to Hibernate was a breeze. However, the difference is the data access objects (DAO). By declaring @Repository, it allows Spring to know that we are working with model objects and will handle the exception as DataAccessException.
@Repository
public class StockRepository {

    @PersistenceContext
    private EntityManager em;

    public List findStocks(String email) {
        List stocks = em.createNamedQuery(Stock.FIND_BY_USER, Stock.class).setParameter("usemail", email).getResultList();
        return stocks;
    }

    public boolean isStockNotExist(String email, String ticker) {
        List stocks = em.createNamedQuery(Stock.FIND_BY_USER_AND_TICKER, Stock.class).setParameter("stticker", ticker).getResultList();
        return stocks.isEmpty();
    }

    public void delete(Integer id) {
        Stock stock = em.find(Stock.class, id);
        em.remove(stock);
    }

    public Stock findStockById(Integer id) {
        return em.find(Stock.class, id);
    }

    public Stock save(Stock stock) {
        return em.merge(stock);
    }
}
Service
The @Service annotation declares the class as a service component which is used for processing business logic and validations. Currently the @Service annotation does nothing more than its parent @Component annotation but that might change in the future. The @Autowired annotation will automagically injects the object for you and you will see this annotation quite often.
The @Transactional annotation is part of the Spring Declarative Transaction Management. You can define the types of transaction you will require which are usually done manually via the entity manager, but spring does this for you with the @Transactional annotations, you can add additional parameters such as: rollback, timeout, isolation, propagation, readOnly etc.
@Service
public class StockService {
    private static final Logger LOGGER = LoggerFactory.getLogger(StockService.class);

    @Autowired
    private StockRepository stockRepository;

    @Autowired
    private UserRepository userRepository;

    @Transactional
    public SearchResult findStocks(String email) {
        assertNotBlank(email, "email cannot be blank");

        List stocks = stockRepository.findStocks(email);

        return new SearchResult<>(stocks.size(), stocks);
    }

    @Transactional
    public void deleteStocks(List ids) {
        notNull(ids, "selection is mandatory");
        ids.stream().forEach((id) -> stockRepository.delete(id));
    }

    @Transactional
    public Stock saveStock(String email, Integer id, String sector, String name, String ticker, Boolean customPrice, BigDecimal price) {
        assertNotBlank(email, "email cannot be blank");
        assertNotBlank(sector, "Stock sector is mandatory");
        assertNotBlank(name, "Stock name is mandatory");
        assertNotBlank(ticker, "Stock ticker is mandatory");
        if (customPrice) {
            notNull(price, "Stock price is mandatory");
        }

        SectorEnum sectorEnum = SectorEnum.getEnum(sector);
        notNull(sectorEnum, "Cannot find the sector");

        Stock stock = null;
        if (id != null) {
            stock = stockRepository.findStockById(id);
            stock.setSector(sectorEnum);
            stock.setName(name);
            stock.setTicker(ticker);
            stock.setCustomPrice(customPrice);
            stock.setPrice(price);
            LOGGER.info("Updating existing stock: id{}", id);
        } else {
            User user = userRepository.findUserByEmail(email);

            if (user != null) {
                stock = stockRepository.save(new Stock(user, sectorEnum, name, ticker, customPrice, price));
                LOGGER.warn("A stock was attempted to be saved for a non-existing user: {} " + email);
            }
        }
        return stock;
    }

    @Transactional
    public List saveStocks(String email, List stocks) {
        return stocks.stream().map((stock) -> saveStock(email, stock.getId(), stock.getSector(), stock.getName(), stock.getTicker(),
                stock.isCustomPrice(), new BigDecimal(stock.getPrice()))).collect(Collectors.toList());
    }
}
Controller
Here I used a RESTful web services, by declaring the @Controller annotation, the application will look for the @RequestMapping annotation as it is requires by theDispatcherServlet in Spring Web MVC Framework. The value inside the@RequestMapping(“/stock”) with determine which controller it should go to and the request header will indicate the method to call.
Exception handling are managed by the @ExceptionHandler annotation. You can specify the types of exceptions and how it should be handled when it is thrown by the code. So you won’t see multiple try-catch blocks inside the method, keeping the code clean and the ability to re-use exception handling. It is also returns the “view” object whenever an exception occurs.
What I like: Look at the code below and ask yourself the question: “How do you pass a POJO through to a RESTful web service?” This was the question I had, usually this is done via passing the object through the HttpServletRequest via theHttpSession object, but here we are using JSON which gets converted to POJO and vice versa. When the front-end (ajax in this case) sends the content type as “application/json”, Spring picks it up with the @RequestBody annotation and converts it into a POJO and it works the other way around with @ResponseBodywhich convert the POJO back into JSON. Just like that, no extra work, it is that simple.
@Controller
@RequestMapping("/stock")
public class StockController {
    private static final Logger LOGGER = LoggerFactory.getLogger(StockController.class);

    @Autowired
    private StockService stockService;

    @ResponseBody
    @ResponseStatus(HttpStatus.OK)
    @RequestMapping(method = RequestMethod.GET)
    public StocksDTO findStocks(Principal principal) {
        LOGGER.info("======================================== BEGIN SERVLET REQUEST ========================================");
        LOGGER.info("> Moving to: StockService.findStocks");

        SearchResult result = stockService.findStocks(principal.getName());

        return new StocksDTO(StockDTO.mapFromStocksEntities(result.getResult()));
    }

    @ResponseBody
    @ResponseStatus(HttpStatus.OK)
    @RequestMapping(method = RequestMethod.POST)
    public List saveStocks(Principal principal, @RequestBody List stocks) {
        LOGGER.info("======================================== BEGIN SERVLET REQUEST ========================================");
        LOGGER.info("> Moving to: StockService.saveStocks");

        List savedStocks = stockService.saveStocks(principal.getName(), stocks);
        return savedStocks.stream().map(StockDTO::mapFromStockEntity).collect(Collectors.toList());
    }

    @ResponseBody
    @ResponseStatus(HttpStatus.OK)
    @RequestMapping(method = RequestMethod.DELETE)
    public void deleteStocks(@RequestBody List id) {
        LOGGER.info("======================================== BEGIN SERVLET REQUEST ========================================");
        LOGGER.info("> Moving to: StockService.deleteStocks");

        stockService.deleteStocks(id);
    }

    @ExceptionHandler(Exception.class)
    public ResponseEntity errorHandler(Exception exc) {
        LOGGER.error(exc.getMessage(), exc);
        return new ResponseEntity<>(exc.getMessage(), HttpStatus.BAD_REQUEST);
    }
}
Spring Verdict
So here I have explained the basic concept of the Spring Web MVC Framework, but does it answer my original question? Is it too soon to jump on the hype train? Does it satisfy my requirements? How well does it perform in a team environment and large projects?
In short, I enjoy learning and developing with the framework and it feels really solid. The development time is extremely fast, without having to declare and initialize all my service and component before use. Due to its modular design, debugging is really easy, code is easy to scale and maintain; it really allows me to focus on developing business requirements and leave the plumbing to Spring. It took less than a week to learn and migrate Stock Monitor to Spring MVC Framework, Angular on the other hand took much longer. I admit my implementation and requirements are fairly simple, and there are many concept that I have not dealt with, but with the huge supporting documentations and user base, I have confidence that it is fairly easy to learn.
focus on developing the business requirements and leave the plumbing to Spring
Spring Environment
Large IT companies usually have multiple systems that integrates with one another which makes service orientated architecture a general requirement. Spring framework “encourages” good coding practices such as loose-coupling with dependency injection, re-usability, modular declarative programming and service oriented design. In brief, Spring simply saves you time, whether reading code, debugging, or development; it allows team members to talk about design and implementation of the components in a clear fashion as opposed to how component should work together. Does that mean we should go and migrate all the systems to Spring?
For new projects, I highly recommend Spring Framework but for existing projects? Depends on the size of the project, small to medium project is doable, but not for anything larger. Let me clarify, a full overhaul will not be an option, it will takes too much time and resources just to do the same thing, business (the guy who pays the bills) will not allow it, it serves no value. This being said, I would develop new components with the Spring Framework along side the existing framework. In conclusion, I find Spring Framework to be robust and easy to use, the learning curve is fairly mild, and I think it is a great tool for developing solid scalable applications.
AngularJS Superheroic Framework
Here are a list of components and versions I used for the front-end framework:
- NodeJS 0.10.25
- Bower 1.6.5
- Angular 1.4.7
- Angular-bootstrap 0.14.3
- Angular-chart.js 0.8.5
- Angular-loading-bar 0.8.0
- Angular-messages 1.4.7
- Angular-toggle-switch 1.3.0
- Angular-ui-router 0.2.15
- Bootstrap 3.3.5
- JQuery 2.1.4
- font-awesome 4.4.0
- lodash 2.4.1
- metisMenu 2.2.0
- oclazyload 1.0.8
- requireJS 2.1.20
- spring-security-csrf-token-interceptor 0.1.5
AngularJS Setup & Configurations
Setting up AngularJS is relatively easy: download the JavaScript files, open up yourindex.html, include it in the html and you are good to go. However, I took a more adventurous route and I got lost and ended up in framework-hell (a special hell for developers who likes new and shiny frameworks).
Really Ugly: During my research on AngularJS, I discovered Bower to manage the front-end libraries so I tried decided to try it out. Before I install Bower I needed to install npm, before I can install npm I needed to install NodeJS. Oh, I also needed to setup a Git repository before you can run Bower. Now that the environment is set up, you can proceed to write the bower configuration file – bower.json. Also, not to mention I was trying to do this through a very restrictive proxy which did not help with the frustration. That being said, Bower is actually pretty cool, it’s like Maven for the front-end and manages the dependencies between different modules and their dependent version.
Once I have all the required libraries, several hundred files in my application later: Angular & related modules, Bootstrap, Font-Awesome, MetisMenu etc., I still need to include them in the HTML page. This is where I stumbled across RequireJS to manage the dependencies for me, why? This is because Angular has a lot of modules, and for each modules there are dependencies that you are required to include them in the HTML page.
RequireJS is a JavaScript file and module loader. It is optimized for in-browser use, but it can be used in other JavaScript environments, like Rhino and Node. Using a modular script loader like RequireJS will improve the speed and quality of your code.
I didn’t find RequireJS useful in Stock Monitor, the reason being that I still had to manually configure the dependencies on the configuration file for each HTML page, I didn’t find an big advantage over the standard script include. So I searched for alternatives that can scan and inject the JavaScript file / modules automatically and insert them into my HTML page and I came across Grunt. This is when I realize I have been wasting time trying to find the perfect framework instead of developing functionalities. All this took about 2 ~ 3 days and I still haven’t coded a single line in AngularJS. Here is where I gave up, and just stick to the manual method by adding them the old way and started to develop functionalities instead.
    <script src="/app/resources/bower_components/jquery/dist/jquery.min.js"></script>
    <script src="/app/resources/bower_components/angular/angular.min.js"></script>
    <script src="/app/resources/bower_components/angular-ui-router/release/angular-ui-router.min.js"></script>
    <script src="/app/resources/bower_components/oclazyload/dist/ocLazyLoad.min.js"></script>
    <script src="/app/resources/bower_components/angular-loading-bar/build/loading-bar.min.js"></script>
    <script src="/app/resources/bower_components/angular-bootstrap/ui-bootstrap-tpls.min.js"></script>
    <script src="/app/resources/bower_components/metisMenu/dist/metisMenu.min.js"></script>
    <script src="/app/resources/bower_components/Chart.js/Chart.min.js"></script>
    <script src="/app/resources/bower_components/lodash/dist/lodash.js"></script>
    <script src="/app/resources/angular/frontend-services.js"></script>
    <script src="/app/resources/angular/app.js"></script>
    <script src="/app/resources/js/stockMonitor.js"></script>
As a suggestion and to make your life easy, just start with index.html with AngularJS JavaScript loaded then add the other components as you go along. Start writing code before you get lost in the framework nightmares.
Building a Single Page Web Application
The most important aspect when it comes to the front-end implementation is the user experience. It is fast and responsive as it only loads the HTML page once and only refreshes the components within the page when required, which reduces the server load. Here are the components that I have used to achieve this.
Module
AngularJS works with modules, it is a container for different part of the application. Such as routing, directives, services, controllers etc. It is the basic foundation for AngularJS, which is reusable and declarative.
Here is the main module that defines the routing which we look explain in the next section. The parameters in the square bracket ([]) are the dependencies that are required in this module. All configuration needs to be configured under a module i.e. services, controller, config, directives etc.
angular.module(‘stockMonitorApp’, [ ‘oc.lazyLoad’, ‘ui.router’, ‘ui.bootstrap’, ‘angular-loading-bar’ ])
Here is my service modules, where all my services get initialized and declared.
angular.module(‘frontendServices’, [])
Here is how you include the AngularJS modules in the HTML page or componenets.
Routing
In order for the application to know where to go when a link or a button is pressed, routing is required. This tells the the site what component to load in the directive, as opposed to loading a whole HTML page. Angular-ui-router module is used to achieve this, by defining different state and its dependencies in the module configuration. This is really nice as oppose to the JSF configuration file or a database driven routing or a html static link. The ui-router also hides the URL with the hashtag instead of a static link.
For example:http://localhost:8080/app/resources/view/index.html#/dashboard/home
'use strict';

angular.module('stockMonitorApp', [ 'oc.lazyLoad', 'ui.router', 'ui.bootstrap', 'angular-loading-bar' ])
    .config(['$stateProvider', '$urlRouterProvider', '$ocLazyLoadProvider', function($stateProvider, $urlRouterProvider, $ocLazyLoadProvider) {

        $ocLazyLoadProvider.config({
            debug : false,
            events : true,
        });

        //default state
        $urlRouterProvider.otherwise('/dashboard/home');

        $stateProvider.state('dashboard', {
            url : '/dashboard',
            templateUrl : '/app/resources/view/dashboard/main.html',
            resolve : {
                loadMyDirectives : function($ocLazyLoad) {
                    return $ocLazyLoad.load({
                        name : 'stockMonitorApp',
                        files : [
                                 '/app/resources/angular/directive/header/header.js',
                                 '/app/resources/angular/directive/header/header-notification/header-notification.js',
                                 '/app/resources/angular/directive/sidebar/sidebar.js'
                                 ]
                    })

                    $ocLazyLoad.load({
                        name : 'toggle-switch',
                        files : [
                                 "/app/resources/bower_components/angular-toggle-switch/angular-toggle-switch.min.js",
                                 "/app/resources/bower_components/angular-toggle-switch/angular-toggle-switch.css" ]
                    })

                    $ocLazyLoad.load({
                        name : 'ngAnimate',
                        files : [ '/app/resources/bower_components/angular-animate/angular-animate.js' ]
                    })

                    $ocLazyLoad.load({
                        name : 'ngCookies',
                        files : [ '/app/resources/bower_components/angular-cookies/angular-cookies.js' ]
                    })

                    $ocLazyLoad.load({
                        name : 'ngResource',
                        files : [ '/app/resources/bower_components/angular-resource/angular-resource.js' ]
                    })

                    $ocLazyLoad.load({
                        name : 'ngSanitize',
                        files : [ '/app/resources/bower_components/angular-sanitize/angular-sanitize.js' ]
                    })

                    $ocLazyLoad.load({
                        name : 'ngTouch',
                        files : [ '/app/resources/bower_components/angular-touch/angular-touch.js' ]
                    })
                }
            }
        })

        .state('dashboard.home', {
            url : '/home',
            controller : 'MainCtrl',
            templateUrl : '/app/resources/view/dashboard/home.html',
            resolve : {
                loadMyFiles : function($ocLazyLoad) {
                    return $ocLazyLoad.load({
                        name : 'stockMonitorApp',
                        files : [
                                 '/app/resources/angular/frontend-services.js',
                                 '/app/resources/angular/controller/main.js',
                                 '/app/resources/angular/directive/dashboard/stats/stats.js'
                                ]
                    })
                }
            }
        })

        .state('dashboard.stock', {
            url : '/stock',
            controller : 'StockCtrl',
            templateUrl : '/app/resources/view/stock.html',
            resolve : {
                loadMyFile : function($ocLazyLoad) {
                    return $ocLazyLoad.load({
                        name : 'chart.js',
                        files : [
                                 '/app/resources/bower_components/angular-chart.js/dist/angular-chart.min.js',
                                 '/app/resources/bower_components/angular-chart.js/dist/angular-chart.css'
                                ]
                    }),

                    $ocLazyLoad.load({
                        name : 'stockMonitorApp',
                        files : [
                                 '/app/resources/angular/frontend-services.js',
                                 '/app/resources/angular/controller/stockController.js'
                                ]
                    })
                }
            }
        })

        .state('dashboard.logout', {
            url : '/logout',
            controller : 'LogoutCtrl',
            templateUrl : '/app/resources/view/logout.html',
            resolve : {
                loadMyFile : function($ocLazyLoad) {
                    return $ocLazyLoad.load({
                        name : 'stockMonitorApp',
                        files : [
                                 '/app/resources/angular/controller/frontend-services.js',
                                 '/app/resources/angular/controller/logoutController.js'
                                ]
                    })
                }
            }
        })
    }
]);
Service
I have defined my service in a different module, where it does the communication between the front-end and the back-end with the request mapping that we have defined in the Controller. Here we are sending the /stock in the URL and it the server picks it up and goes to the controller with that mapping and then process and return the response. The service layer sends the data via JSON to the server side for processing.
.service('StockService', ['$http', '$q', function($http, $q) {
    return {
        //find stock
        findStocks: function(){
           var deferred = $q.defer();

            $http({
                method: 'POST',
                url: '/app/stock',
                data: stocks,
                headers: {
                    "Content-Type": "application/json",
                    "Accept": "text/plain, application/json"
                }
            })
            .then(function (response) {
                if (response.status == 200) {
                    deferred.resolve();
                } else {
                    deferred.reject("Error finding stocks: " + response.data);
                }
            });

            return deferred.promise;
        },
        //save list
        saveStocks: function(stocks) {
           var deferred = $q.defer();

            $http({
                method: 'POST',
                url: '/app/stock',
                data: stocks,
                headers: {
                    "Content-Type": "application/json",
                    "Accept": "text/plain, application/json"
                }
            })
            .then(function (response) {
                if (response.status == 200) {
                    deferred.resolve();
                } else {
                    deferred.reject("Error saving stocks: " + response.data);
                }
            });

            return deferred.promise;
        },
        //delete list
        deleteStocks: function(ids) {
           var deferred = $q.defer();

            $http({
                method: 'DELETE',
                url: '/app/stock',
                data: ids,
                headers: {
                    "Content-Type": "application/json"
                }
            })
            .then(function (response) {
                if (response.status == 200) {
                    deferred.resolve();
                } else {
                    deferred.reject('Error deleting stocks');
                }
            });

            return deferred.promise;
        }
    }
}])
Controller
In the controller layer, we are coordinating the communication between the service layer and the view layer. Here we retrieve the data from the service layer and populate and manipulate the view object, then we sent it back to the service layer for processing. The controller constantly talks to the view layer asynchronously via the $http and $q modules via the service layer when there is a change.
.controller('StockCtrl', ['$scope' , 'StockService', '$timeout',
    function ($scope, StockService, $timeout) {

        $scope.vm = {
            originalStocks: [],
            stocks: [],
            isSelectionEmpty: true,
            errorMessages: [],
            infoMessages: []
        };

        loadStockData(null, null, null, null, 1);

        function markAppAsInitialized() {
            if ($scope.vm.appReady == undefined) {
                $scope.vm.appReady = true;
            }
        }

        function loadStockData() {
            StockService.findStocks()
                .then(function (data) {
                    $scope.vm.errorMessages = [];
                    $scope.vm.originalStocks = _.map(data.stock, function (stock) {
                        return stock;
                    });

                    $scope.vm.stocks = _.cloneDeep($scope.vm.originalStocks);

                    _.each($scope.vm.stocks, function (stock) {
                        stock.selected = false;
                    });

                    markAppAsInitialized();

                    if ($scope.vm.stocks && $scope.vm.stocks.length == 0) {
                        showInfoMessage("No results found.");
                    }
                },
                function (errorMessage) {
                    showErrorMessage(errorMessage);
                    markAppAsInitialized();
                });
        }

        $scope.add = function () {
            $scope.vm.stocks.unshift({
                id: null,
                name: null,
                ticker: null,
                sector: null,
                custom: null,
                price: null,
                selected: false,
                new: true
            });
        };
View
Angular uses directive when it comes to view model, you can make custom directives or use the built in ones. Directives are used long side the HTML element.
At a high level, directives are markers on a DOM element (such as an attribute, element name, comment or CSS class) that tell AngularJS’s HTML compiler($compile) to attach a specified behavior to that DOM element (e.g. via event listeners), or even to transform the DOM element and its children.
Here we can see some of these directives in action: ng-repeat, ng-model, tt-editable-cell, tt-date-time-picker, tt-cell-field, tt-numeric-field. The first two being angular directives while the rests are custom made. Custom directive can be very flexible, you can creative new components and reuse them in your HTML pages making AngularJS component focused. You can think of directives as JSP Custom Tags except it is much easier to implement and is written in HTML and JavaScript.
| Stock Name | Ticker / Abbreviation | Sector | Use Custom Price? | Custom Price | |
|---|---|---|---|---|---|
Here is a example of how to define a custom directive:
.directive('ttEditableCell', function() {
    return {
        scope: {
            value: '=',
            isNew: '='
        },
        transclude:true,
        replace:true,
        templateUrl: '/app/resources/partials/editable-cell.html',
        controller: ['$scope', function($scope) {

            $scope.cellState = {
                editMode: false
            };

            $scope.onValueChanged = function (newValue) {
                $scope.value = newValue;
            };

            $scope.edit = function() {
                $scope.cellState.editMode = true;
            };

        }]
    };
})
AngularJS Verdict
Here is a screenshot of Stock Monitor 2.0, it is fairly basic and incomplete in terms of functionality but it is able to demonstrate the framework from the front-end to the back-end. The learning curve is around 2 ~ 3 weeks for me.
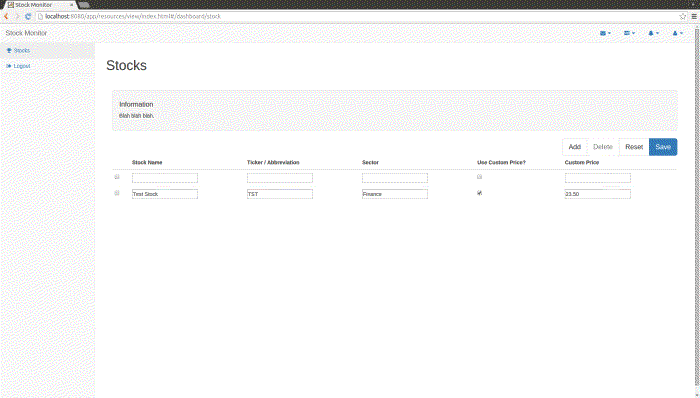
So, back to the topic of a single page application. Here the header and the side bar only get loaded once, only the main frame get loaded with new content when navigating between component, here it loads the stock.html. When you click on the Add Button, the HTML calls the Angular controller to insert a new row of inputs. Once you have inserted all the values and click on the Save Button, angular controller goes and validate the values then compiles them into JSON and send them off to the service layer. The service layer then sends the JSON data through to the back-end for processing. All this happens in real time with ajax, there are no page refreshes or loading during this process, making the application fluid and user friendly. This is achieved via the Angular directives inside the HTML tags.
What I like: The AngularJS implementation is clean and maintainable, I like the segregation of duties of the MVC framework instead of one JavaScript file that does everything. In a team environment it can be very useful, as long as the view (JSON data + HTTP request data) is defined between the front-end and the back-end team, they can continue to develop their own components. The front-end team can simply run a JSON server to simulate the data that get returned from the back-end without waiting for the back-end developers, which can speed up developmentprocess.
The directives are quite powerful and it uses HTML and JavaScript to achieve this, which means you can actually do virtually anything and promotes reusable component. These components get updated real-time via the view-controller interaction, so the front-end is always updated without page refresh.
There is a wealth of modules and documentations online, so finding resources are easy.
What I dislike: Lots of coding, it almost feels as if I was writing the back-end implementation again. I cannot simply use the object from the back-end Java object directly, instead I had to operate with a JavaScript object from the JSON data. Also, defining the service layer and the controller layer can be tedious, it is like having a deja-vu, “haven’t I done this before?” feeling.
The problem that I had with AngularJS is when I missed a JavaScript include, AngularJS tried to load it over and over again which resulted in a memory leak and the application stopped responding. This makes debugging difficult, because the browser becomes unresponsive and the error log is so full, that I don’t know what the initial errors were.
With regards to migrating to AngularJS, my answer is a definite “No”, not even for small projects. My reasoning is that you will need to breakdown the entire existing front-end to use a Angular controller and directives. The process is inefficient so I would not recommend migrating.
However, with regards to new project AngualrJS may be an option, but this really depends on the type of requirements. For simple project, AngularJS is an overkill. For medium and large project in a team environment, I believe it can work, since it has a mature framework that promotes modularity, reusuability and it is very structured. However, here is the big BUT.
Really Ugly: Do you know Angular 2.0 is on it way? Do you know that it is not backward compatible? Yep. I am not sure where AngularJS will end up in the future. My concern is whether I should continue to develop the front-end with AngularJS, wait for the next version or ditch the framework entirely?
Final Conclusion
In the end, I had great experiences working with both Spring and AngularJS. Spring really surprises me and exceeded my expectations Angular, on the other hand, was interesting to work with but I am not sold on it. I believe it all depends on the business requirements, then finding the appropriate tools to solve it. AngularJS feels too complicated for my requirements, but I do believe there is a place for it in a more complex environment.