This is the second post in a series on how to set up infrastructure with Amazon Web Services (AWS)
Introduction

This post sets up a continuous integration server with the EC2 instance from the previous post in this series. We will set up Jenkins to continuously build Java code with Maven, as well as the Amazon EC2 Plugin on Jenkins to spawn on-demand slaves on AWS that will build the code.
This tutorial will consist of three broad steps:
- Set up continuous integration server (Jenkins)
- Use Maven profiles to separate builds
- Set up Jenkins to use EC2 slaves
What is continuous integration?
Continuous integration, as defined by Martin Fowler: “Continuous Integration is a software development practice where members of a team integrate their work frequently, usually each person integrates at least daily – leading to multiple integrations per day. Each integration is verified by an automated build (including test) to detect integration errors as quickly as possible. Many teams find that this approach leads to significantly reduced integration problems and allows a team to develop cohesive software more rapidly.”
To achieve continuous integration, this tutorial will set up numerous Jenkins jobs for one code project, where each job has a specific function to fulfill. We will accomplish this by adding Maven profiles to the pom.xml file of the parent module in your Maven project and having Jenkins jobs for these profiles.
First, we need a job that runs every time a user checks in code. This job will build the code and perform unit tests whenever someone checks code into the repository. Additionally, we also need a job that runs every night and performs unit testing. If this job builds successfully, it will trigger another job that performs integration testing. Integration tests can sometimes take a while to complete, resulting in fairly long build times (especially if there are a large number of integration tests). This is why we separate the tests into different builds so that the build times of the individual jobs are as quick as possible.
We want to use AWS EC2 instances as Jenkins slaves to build the code. The Amazon EC2 Plugin lets Jenkins to spawn slaves when they are needed, and whatever instance type is needed. This saves costs by allowing the Jenkins master server, which will be online 24 hours a day, to be small. The slaves are more powerful servers that will be started up when they are needed, and we only pay for the time that they are actually running
Prerequisites and assumptions
- This tutorial uses an Ubuntu server where Jenkins will be installed.
- The URL of the Jenkins server is referred to as http://jenkins-url in this tutorial.
- It is assumed that you already have a Maven project and some knowledge of Maven.
- Your Maven project should be under version control. For the purposes of this tutorial we use SVN.
- You need an AWS account and some basic AWS knowledge. See the previous post in this series for help with AWS and setting up a VM in AWS.
Install Java 8
Jenkins requires that a JDK and JRE be installed. We will install Oracle Java 8 on Ubuntu using the PPA file.
First, use the following commands to add the webupd8team Java PPA repository in your system and install it.
sudo apt-get update
sudo apt-get install oracle-java8-installer
Next, install this package to set up the environment variables:
After the installs, verify the installed versions with the following command:
You should see this output:
Java(TM) SE Runtime Environment (build 1.8.0_45-b14)
Java HotSpot(TM) 64-Bit Server VM (build 25.45-b02, mixed mode)
Install Jenkins
On Ubuntu, Jenkins can be installed with apt-get. We will refer to this VM as the Jenkins master.
sudo sh -c ‘echo deb http://pkg.jenkins-ci.org/debian binary/ > /etc/apt/sources.list.d/jenkins.list’
sudo apt-get update
sudo apt-get install jenkins
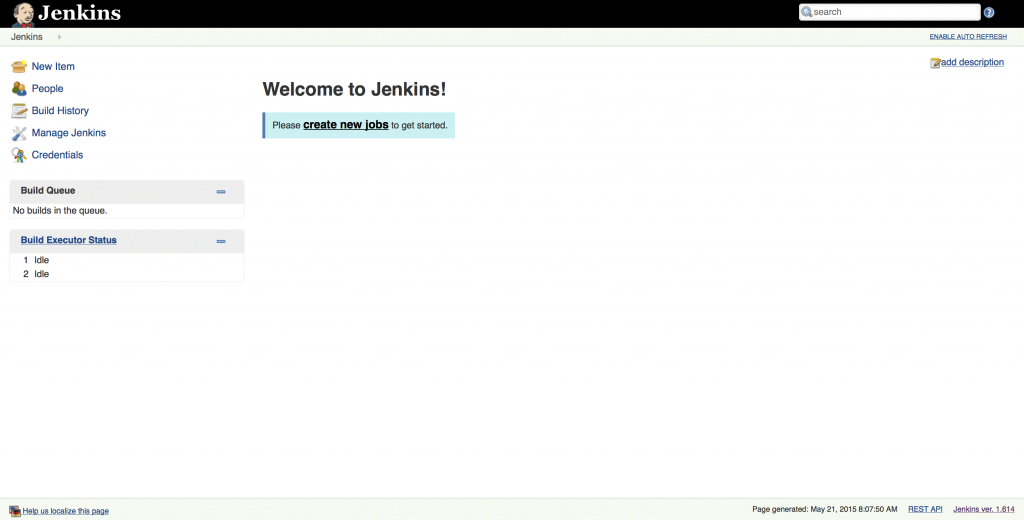
This installation will create a Jenkins service that gets launched on start up and create a ‘jenkins’ user on your computer to run the service. By default, Jenkins listens on port 8080. After the installation, navigate to http://jenkins-url:8080 and you will see the default Jenkins homepage.
Configure Jenkins
Security
Note that, by default, Jenkins has no security enabled and is open for everyone to access if your server is publicly available on the Internet.
To secure your Jenkins installation, click on the Manage Jenkins link on the left and then click Configure Global Security.
Tick Enable security and then select Jenkins’ own user database as the Security Realm and do not allow people to sign up
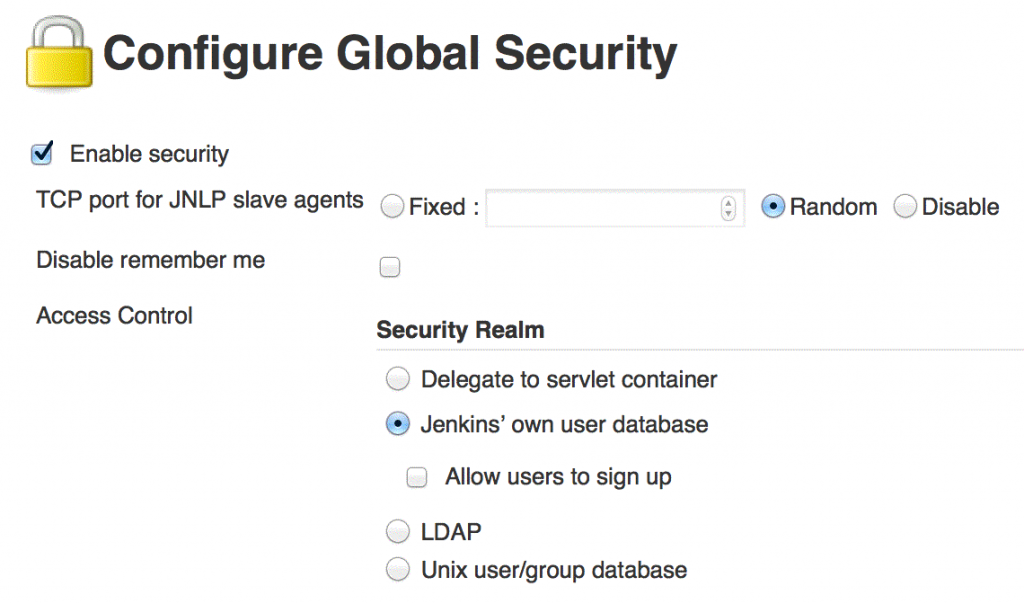
Under Authorization select Matrix-based security. Make sure that the Anonymous user only has Read access under the View group, and then click on Save.
Click on the Jenkins icon to navigate to the Jenkins homepage. You’ll be redirected to a sign up page where you need to create the first Jenkins user (this will be the admin user). Enter the user details into all the fields and click the Sign up button. You will be automatically logged in as the user you just signed up.

Jenkins and Maven Install
We want our Jenkins jobs to run on an EC2 slave. The slave is on a separate VM (actually an EC2 instance in the AWS cloud), and will not be able to use the JDK installed on the Jenkins master. Therefore, we need to set up JDK and Maven configurations that will be installed on the slave before it builds the code.
Go to http://jenkins-url:8080 and click on Manage Jenkins in the menu on the left, then select Configure System.
Under the JDK section, add a JDK. Give it a name and tick the box that says install automatically. From the dropdown list, select Java SE Development Kit 7u80, agree to the license agreement and enter your Oracle account’s username and password.

Then, under the Maven section, add a Maven installation. Give it a name and tick the box that says install automatically. From the dropdown list, select version 3.2.2 and then click on the Save button.

Plugin Install
Navigate to Manage Jenkins and then Manage Plugins. Click on the Available tab and search for “clone workspace”. Tick the box and then click on Download now and install after restart. On the next page, tick the box to restart Jenkins.

Maven Profiles
Now that Jenkins is installed and secured, we have completed the first step of this tutorial. Now it is time to set up the different Maven profiles in our code project.
Separating Unit and Integration Test with Maven
The Maven Failsafe Plugin is designed to run integration tests while the Maven Surefire Plugin is designed to run unit tests. In your code, there should be some way to distinguish whether tests are integration tests (e.g. naming it *IT.java) so that Surefire can ignore them, while Failsafe will execute them in the integration-test phase and collect results in the verify phase.
Create the Unit Test Profile
Go to the pom.xml of the parent module in your Maven project. Add the following properties under the <properties> tag:
pom.xml
target/jacoco.exec
target/jacoco-it.exec
After the tag, add opening and closing tags if you do not already have them.
pom.xml
...


...
Then, after the tag, add the following profile for unit tests:
pom.xml
<profile>
    <!-- Only run Unit Tests with Coverage -->
    <id>Unit-Tests</id>
    <activation>
        <activeByDefault>true</activeByDefault>
    </activation>
    <build>
        <plugins>
            <plugin>
                <artifactId>maven-surefire-plugin</artifactId>
                <configuration>
                    <source>${maven.compiler.source}</source>
                    <target>${maven.compiler.target}</target>
                    <argLine>${argLine}</argLine>
                    <excludes>
                        <exclude>**/*IT.java</exclude>
                    </excludes>
                </configuration>
                <dependencies>
                    <dependency>
                        <groupId>org.apache.maven.surefire</groupId>
                        <artifactId>surefire-junit47</artifactId>
                        <version>${version.surefire-junit47}</version>
                    </dependency>
                </dependencies>
            </plugin>
            <plugin>
                <groupId>org.jacoco</groupId>
                <artifactId>jacoco-maven-plugin</artifactId>
                <configuration>
                    <dataFile>${sonar.jacoco.reportPath}</dataFile>
                    <destFile>${sonar.jacoco.reportPath}</destFile>
                </configuration>
                <executions>
                    <execution>
                        <phase>generate-test-resources</phase>
                        <goals>
                            <goal>prepare-agent</goal>
                        </goals>
                    </execution>
                    <execution>
                        <id>report</id>
                        <phase>prepare-package</phase>
                        <goals>
                            <goal>report</goal>
                        </goals>
                    </execution>
                </executions>
            </plugin>
        </plugins>
    </build>
</profile>
This profile will only run unit tests using the Maven Surefire plugin. It will exclude any tests whose filename ends in IT.java, as it assumes these are integration tests.
The activeByDefault tag is set to true, so this is the profile that will be used if no profile is specified as part of the build. However, you can explicitly specify a build to use this profile by executing:
mvn clean install -PUnit-Tests
Create the Integration Test Profile
In the same pom.xml file of the parent module, add the following code for the integration test profile:
pom.xml
<profile>
    <!-- Only run Integration Tests with Code Coverage -->
    <id>Int-Tests</id>
    <activation>
        <activeByDefault>false</activeByDefault>
    </activation>
    <dependencies>
        <dependency>
            <groupId>org.jboss.arquillian.extension</groupId>
            <artifactId>arquillian-jacoco</artifactId>
            <scope>test</scope>
        </dependency>
        <dependency>
            <groupId>org.jacoco</groupId>
            <artifactId>org.jacoco.core</artifactId>
            <scope>test</scope>
        </dependency>
    </dependencies>
    <build>
        <plugins>
            <plugin>
                <artifactId>maven-compiler-plugin</artifactId>
                <configuration>
                </configuration>
            </plugin>
            <plugin>
                <artifactId>maven-surefire-plugin</artifactId>
                <configuration>
                    <skip>true</skip>
                </configuration>
            </plugin>
            <plugin>
                <artifactId>maven-failsafe-plugin</artifactId>
                <configuration>
                    <includes>
                        <!-- default for failsafe-plugin is **/*IT.java  -->
      #160;                 <include>**/*IT.java</include>
                    </includes>
                    <argLine>${argLine}</argLine>
                </configuration>
                <executions>
                    <execution>
                        <id>failsafe-integration-test</id>
                        <phase>integration-test</phase>
                        <goals>
                            <goal>integration-test</goal>
                        </goals>
                    </execution>
                    <execution>
                        <id>failsafe-verify</id>
                        <goals>
                            <goal>verify</goal>
                        </goals>
                    </execution>
                </executions>
            </plugin>
            <plugin>
                <groupId>org.jacoco</groupId>
                <artifactId>jacoco-maven-plugin</artifactId>
                <configuration>
                    <dataFile>${sonar.jacoco.itReportPath}</dataFile>
                    <destFile>${sonar.jacoco.itReportPath}</destFile>
                </configuration>
                <executions>
                    <execution>
                        <phase>generate-test-resources</phase>
                        <goals>
                            <goal>prepare-agent</goal>
                        </goals>
                    </execution>
                    <execution>
                        <id>report</id>
                        <phase>prepare-package</phase>
                        <goals>
                            <goal>report</goal>
                        </goals>
                    </execution>
                </executions>
            </plugin>
        </plugins>
    </build>
</profile>
This profile uses Failsafe to do integration testing with all tests whose file names end in IT.java. The Surefire plugin is disabled, so no unit tests are run. To run a build with this profile, you need to use the verify Maven goal and not the clean install Maven goals.
mvn verify -PInt-Tests
Create Jenkins Jobs
We have created the different Maven profiles in the project’s pom.xml file and finished step 2 of the tutorial.
Now we will set up 3 Jenkins jobs:
- A checkin job that polls the repository every 5 minutes and build the code (with unit tests) if it has been changed.
- A job that polls the repository every night and builds the code (with unit tests) if it has been changed.
- A job that gets started by the unit test nightly job if it was successful and performs integration testing.
Checkin Job
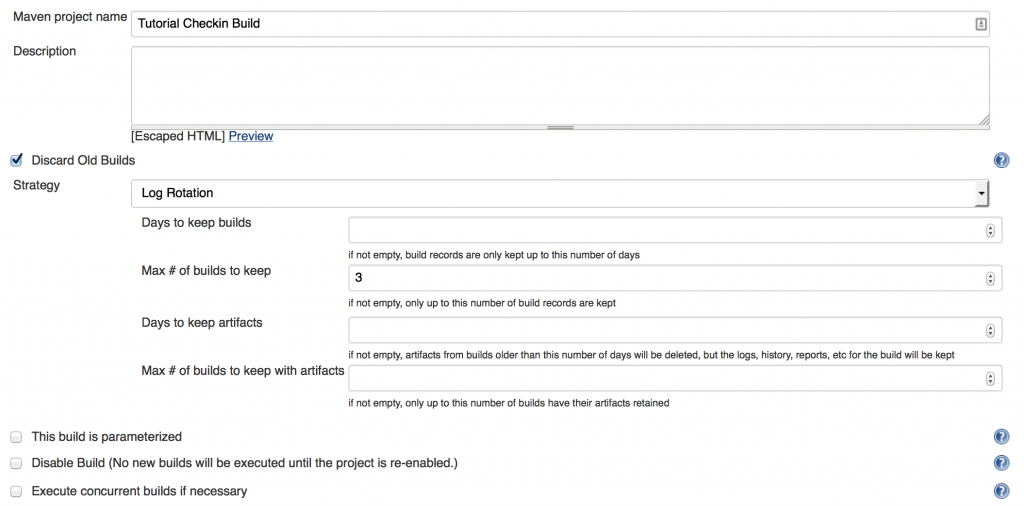
First we will create the build that runs whenever someone commits code to the project’s SVN repository. Go to the Jenkins homepage at http://jenkins-url:8080, click on New Item in the menu on the left and select Maven project. Give your job a name (make sure you can identify this as the checkin build) and then click on OK.
On the next page, select Discard Old Builds and then set the Max # of builds to keep to 3. If you do not do this Jenkins will keep the data from all the builds, which can quickly take up a whole lot of disk space.
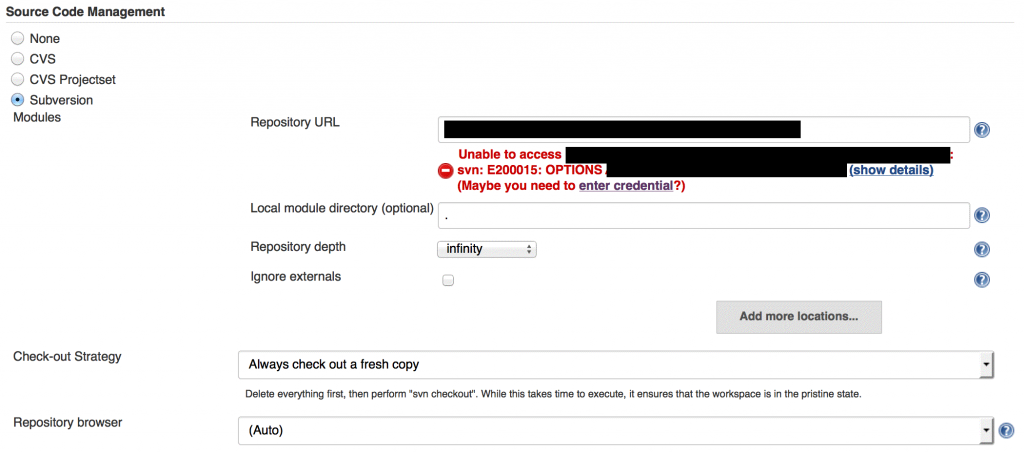
 Under Source Code Management, choose Subversion and enter the Repository URL.
If your SVN repository has access control, you will see a red error message. Click on the link to enter credentials and enter your SVN credentials on the page that pops up.
Also, set the Check-out Strategy to always check out a fresh copy.
 Under the Build Triggers section, tick Poll SCM and make sure all the other boxes are not ticked. For the Schedule, enter:
This will poll the repository every 5 minutes to see if there has been a change in the source code. The job will build the code if it finds that there has been a change.
Use the following Goals and options under the Build section:
This will build the code using the unit test profile that we set as the default profile.
Leave all the other settings as they are and click on Apply.
Nightly Job
Go to the Jenkins dashboard and create a New Item. Give the job a name that allows you to identify it as the nightly build. Select copy from existing item, and enter the name of the checkin build you created earlier.
On the next page, leave all the settings as they are (they will be the same as the checkin build’s settings), but change Schedule under Build Triggers to:
This job will poll the repository every night at midnight and run if there has been a change in the source code, using the default unit test profile that we set in the pom.xml.

Integration Test Job
Go to the Jenkins dashboard and create a New Item. Give the job a name that allows you to identify it as the integration test build. Select copy from existing item, and enter the name of the checkin build you created earlier.
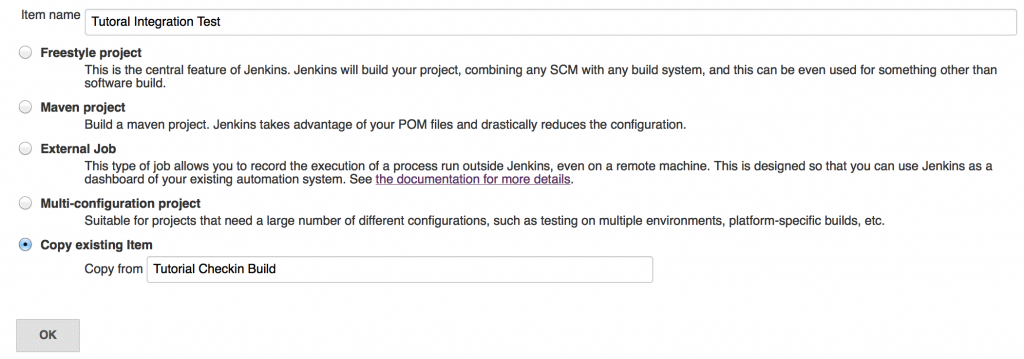 On the next page, click on the Save button. We need to go back to the nightly job and make it a parent of the integration test job. On the Jenkins dashboard, click on the nightly build and select Configure.
Under Post-build Actions, select Archive for Clone-Workspace SCM. Add
to Files to include in cloned workspace and change Criteria for build to be archived to Most Recent Successful Build.
Create another post-build action, Build other projects. Enter the name of the integration test build and trigger it only if the build is stable. Click on Save.
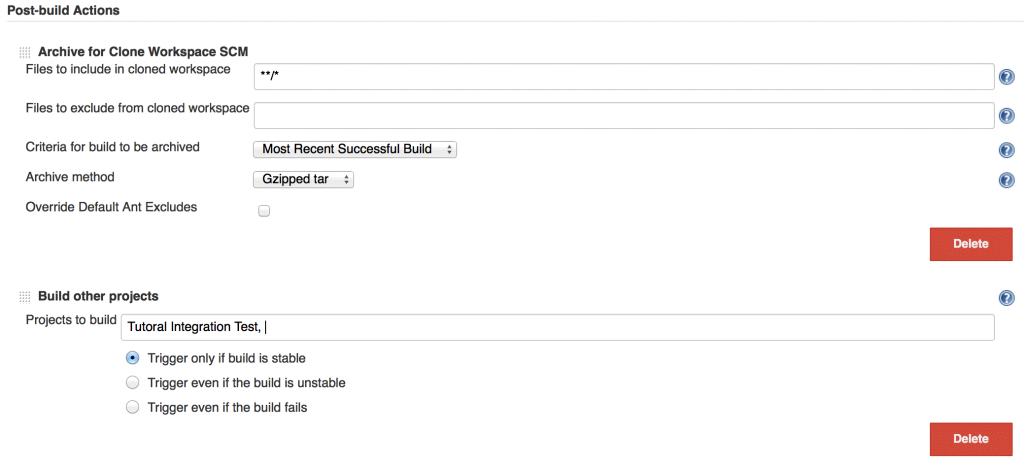 Go back to the configuration for the integration test build. Under Source Code Management select Clone Workspace and choose the nightly build. Untick all boxes under Build Triggers. We want the unit test nightly job kick off this job.
Also, change the Goals and options under Build to:
This will u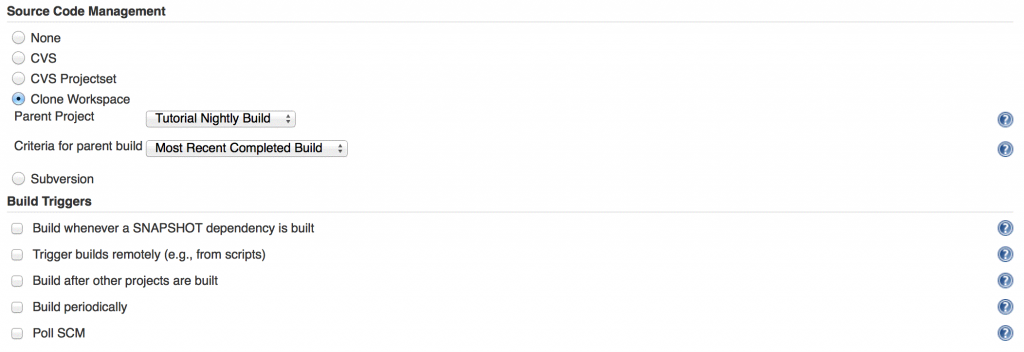
<image>
EC2 Slaves
You have completed the step 2 in this tutorial, so on to step 3. We need to set up the EC2 slaves that Jenkins will spawn whenever it needs to perform a build. First, we need to install the plugin and then we need to configure Jenkins to use it.
EC2 Plugin Install
Navigate to Manage Jenkins and then Manage Plugins. Click the Available tab and search for “EC2 Plugin”. Tick the box to install it and then select Download now and install after restart. On the next page, tick the box to restart Jenkins.
 Once the plugin is installed and Jenkins restarted, navigate to Manage Jenkins and then Configure System.
At the top of the page, change the # of executors to 0. Then, scroll down to the Cloud section, add a new Amazon EC2 cloud and follow these steps:
- Get your Amazon Access Key ID by going to this page and managing the accessing keys under Users.
- Enter the Access Key ID and Secret Access Key.
- Select a region from the dropdown list. If you’re using EC2 as a server for your Jenkins master, make the regions the same.
- Either create a new key pair in AWS, or click the Generate Key button and then copy and paste it into the EC2 Key Pair’s Private Key field. You can test the connection to check if it is successful.
- Add an AMI and give it some description.
- Enter the AMI ID. To create slaves with the standard Ubuntu 14.04 AMI, go to AWS and try and create a new EC2 instance. Find the AMI ID (it will be something like ami-d05e75b8) of the AMI you are looking for and cancel the EC2 creation. Or, you can create an AMI from an existing EC2 instance that you set up and use this as a Jenkins slave (this is what we did).
- Choose an instance type. We chose m3.large.
- Enter the AWS security group name (not ID) that the EC2 slave will use.
- Set a remote root folder on the slave.
- If you chose an Ubuntu AMI, set the remote user to ubuntu. This user has login privileges on the EC2 instance.
- If you have a unix AMI type, set the Root command prefix to ‘sudo’ and Remote ssh port to 22.
- You can enter an initialisation script that will be executed on the slave at start up. This can be used to install software, set environment variables, mount drives, etc.
- Click on Advanced.
- Set the number of executors that you want each slave to have. We have 4 executors on a slave with an m3.large instance type.
- If you have an AWS VPC, enter your Subnet ID.
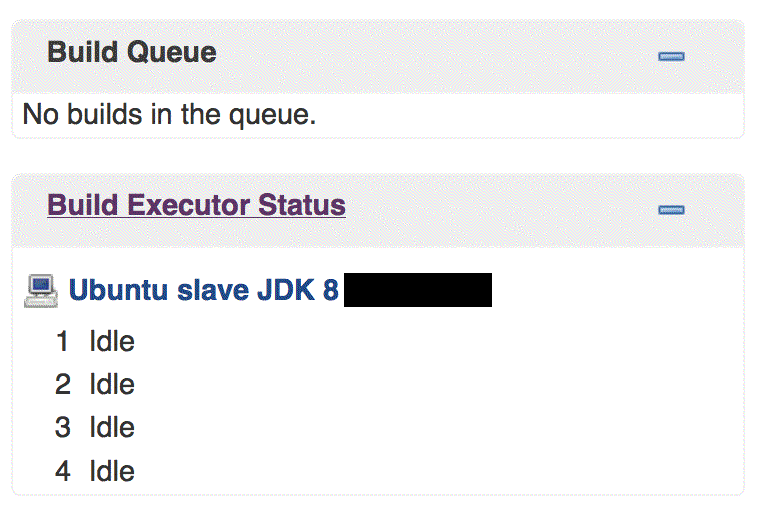
When you run a build, you will now see a slave appear in the Build Executor Status window on the left. When there are no builds running, by default the slave will stay idle for 30 minutes before it disconnects. This can be set in the Jenkins system configuration page.
That’s it! You have successfully set up a continuous integration environment with Jenkins that runs its builds on EC2 slaves, which get spawned on-demand and only stay online for as long as they’re needed. Also, you now know how to use Maven profiles to run separate builds for unit tests and integration tests. 
![]()
![]()
