
Configure automated deployments to Wildfly from your Jenkins build server
Introduction

This two-part series of blog posts focuses on automated deployments to a Wildfly 8.2.0 application server from Jenkins using the wildfly-maven-plugin.
Jenkins can be configured to do automated deployments to an application server using Maven, specifically using the wildfly-maven-plugin. This post will focus on how to quickly set up the wildfly-maven-plugin to deploy, redeploy and undeploy an application. It will also cover how to automate the deployment with a Jenkins build.
Wildfly-maven-plugin
The plugin needs to be configured in the Top Level Project’s (TLP) pom, parent’s pom and in the pom of each of the modules of the project.
Below is a step-by-step guide to setting up the plugin in your project, which will put you one step closer to being more efficient.
Maven Dependency
Under pluginManagement in the TLP POM, add the following entry:
</pluginManagement>
    <plugins>
        ...
        <plugin>
            <groupId>org.wildfly.plugins</groupId>
            <artifactId>wildfly-maven-plugin</artifactId>
            <version>1.0.2.Final</version>
            <configuration>
                <skip>true</skip>
            </configuration>
        </plugin>
        ...
    </plugins>
</pluginManagement>
Plugin Configuration
The code below is an example of two profiles, which can be used to deploy an application to the Wildfly application server in either standalone or domain mode. For this blog we are just going to use standalone mode.
Note that ${wildfly.mgtPort} corresponds to the management port entry for your server in your Maven settings.xml file. Make sure they are both mgtPort.
In the parent POM, add the following:
<profiles>
    ...
    <profile>
            <id>domain-mode</id>
            <build>
                <plugins>
                    <plugin>
                        <groupId>org.wildfly.plugins</groupId>
                        <artifactId>wildfly-maven-plugin</artifactId>
                        <configuration>
                            <skip>true</skip>
                            <domain>
                                <server-groups>
                                    <server-group>other-server-group</server-group>
                                </server-groups>
                                <profiles>
                                    <profile>full-ha</profile>
                                </profiles>
                            </domain>
                            <filename>${artifactId}.${packaging}</filename>
                            <port>${wildfly.mgtPort}</port>
                        </configuration>
                        <executions>
                            <!-- Deploy the application on install -->
                            <execution>
                                <id>deploy</id>
                                <goals>
                                    <goal>deploy</goal>
                                </goals>
                            </execution>
                        </executions>
                    </plugin>
                </plugins>
            </build>
        </profile>
        <profile>
            <id>standalone-mode</id>
            <build>
                <plugins>
                    <plugin>
                        <groupId>org.wildfly.plugins</groupId>
                        <artifactId>wildfly-maven-plugin</artifactId>
                        <configuration>
                            <skip>true</skip>
                            <filename>${artifactId}.${packaging}</filename>
                            <port>${wildfly.mgtPort}</port>
                        </configuration>
                        <executions>
                            <!-- Deploy the application on install -->
                            <execution>
                                <id>deploy</id>
                                <goals>
                                    <goal>deploy</goal>
                                </goals>
                            </execution>

                            <execution>
                                <id>undeploy</id>
                                <goals>
                                    <goal>undeploy</goal>
                                </goals>
                                <configuration>
                                    <ignoreMissingDeployment>true</ignoreMissingDeployment>
                                </configuration>
                            </execution>
                        </executions>
                    </plugin>
                </plugins>
            </build>
        </profile>
<profiles>
Project Modules Configuration
Because we set up the plugin configuration in a profile in the parent’s POM, we can just add the following couple of lines to all the modules’ POMs in the project.
If you don’t wish to deploy the module, change the value in the skip tag below to true.
<build>
    <plugins>
        ...
        <plugin>
            <groupId>org.wildfly.plugins</groupId>
            <artifactId>wildfly-maven-plugin</artifactId>
            <configuration>
                <skip>false</skip>
            </configuration>
        </plugin>
    </plugins>
</build>
Run Configuration
Run the build with mvn wildfly:deploy-only -Pstandaone-mode.
The maven goal wildfly:deploy-only is used to deploy the artifact to Wildfly, using the standalone-mode profile that we defined earlier.
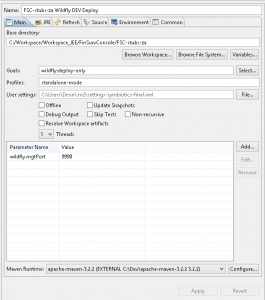
If you do not want to leave the comfort of your IDE, you can define an Eclipse run configuration as follows:
- Give the build configuration a name.
- The goal for the run config is the goal we defined in the standalone-mode profile under Plugin configuration.
- The profile points to the last mentioned profile (standalone-mode).
- The only thing we need to add is the wildfly.mgtPort as a variable in the config. If your Wildfly Application Server is running on its default port, with port-offset 0, the admin port should be on 9990. This variable maps to ${wildfly.mgtPort}, in the configuration section of the profile.
To undeploy the artifacts, you can add another run config similiar to the above, just change the goal to wildfly:undeploy.
To deploy from Eclipse select Run as -> Maven build ->Select your build config
Jenkins Configuration
Create a new Jenkins job that, when built, will deploy the artifact to your Wildfly application server. The Jenkins deployment configuration is similar to what we did previously, just with a few extra parameters.
Configure the job to have the following String parameters with appropriate default values:
- deploy.force with a default value of true (if already deployed then do a redeploy; false will fail if already deployed)
- wildfly.hostname (the hostname of your Wildfly application server)
- wildfly.id (the id of the server in settings.xml to retrieve username and password from)
- wildfly.port (the Wildfly admin port)
Set the Maven goal to the same as before: wildfly:deploy-only -Pstandalone-mode.
Additionally, you can create this job as part of a build pipeline that executes daily, ensuring that your latest code (if it compiles!) will be deployed at least once a day.
Now you have set up automated deployments for your project. Yay!
However, when the version of your project changes the automated deployment will fail. This is because the older version of the project is still deployed, and Wildfly cannot simply overwrite the deployment because their versions differ. Whenever a version changes you could manually remove the old version’s deployment and try to deploy the new version again, or you could read part 2 of this series of blog posts.
